What is load testing?
Load Testing is a subset of performance testing where we test the system's response under varying load conditions by simulating multiple users accessing the application concurrently. This testing usually measures the speed and capacity of the application. Thus, whenever we modify the load, we monitor the behavior of the system under various conditions.
Examples of load testing
- Downloading a series of large files from the internet
- Running multiple applications on a computer or server simultaneously
- Assigning many jobs to a printer in a queue
- Subjecting a server to a large amount of traffic
- Writing and reading data to and from a hard disk continuously
Load testing tools
One of the most popular testing tools among Locust is jMeter. jMeter is one of the solidly proven performance testing frameworks. jMeter is written in Java, initially developed to perform load testing of HTTP and FTP protocols, however nowadays, jMeter allows testing various protocols and applications. Unlike Locust, jMeter has a Web Interface for manual test setup.
| Locust | jMeter | |
| Operating System | Any | Any |
| Open Source | Yes | Yes |
| GUI | Yes, with non-GUI mode available | No |
| Support of “Test as Code” | Weak (Java) | Strong (Python) |
| In-built Protocols Support | HTTP | HTTP, FTP, JDBC, SOAP, LDAP, TCP, JMS, SMTP, POP3, IMAP |
| Integrated Host Monitoring | Yes, PrefMon | No |
| Recording Functionality | No | Yes |
| Distributed Execution | Yes | Yes |
| Easy to use with VCS | Yes | No |
| Resources Consumption | Very efficient, greenlet support | Moderate efficiency |
| Number of Concurrent Users | High, each User is a greenlet | Moderate, each User is a thread |
| Ramp-up Flexibility | Yes | Yes |
| Test Results Analyzing | Yes | Yes |
Introduction to Locust
Locust is an easy-to-use, distributed, user load testing tool. Intended for load testing websites (or other systems) and figuring out how many concurrent users a system can handle.
The idea is that during a test, a swarm of locusts will attack your website. The behavior of each locust (or test user if you will) is defined by you and the swarming process is monitored from a web UI in real-time. This will help you battle test and identify bottlenecks in your code before letting real users in.
Locust is completely event-based, and therefore it’s possible to support thousands of concurrent users on a single machine. In contrast to many other event-based apps it doesn’t use callbacks. Instead, it uses light-weight processes, through gevent. Each locust swarming your site is actually running inside its own process (or greenlet, to be correct). This allows you to write very expressive scenarios for Python development without complicating your code with callbacks.
Advantages:
- Simple and accurate documentation
- Utilizes request library
- Each User is represented via greenlet, light weight thread
- Tests are written in Python
- A dedicated Flask web-server to present test results
Disadvantages:
- No capture and Replay, tests are written as a code
- Need to understand HTTP protocol
- Minimal programming skills required
- Linear load model
Locust Architecture

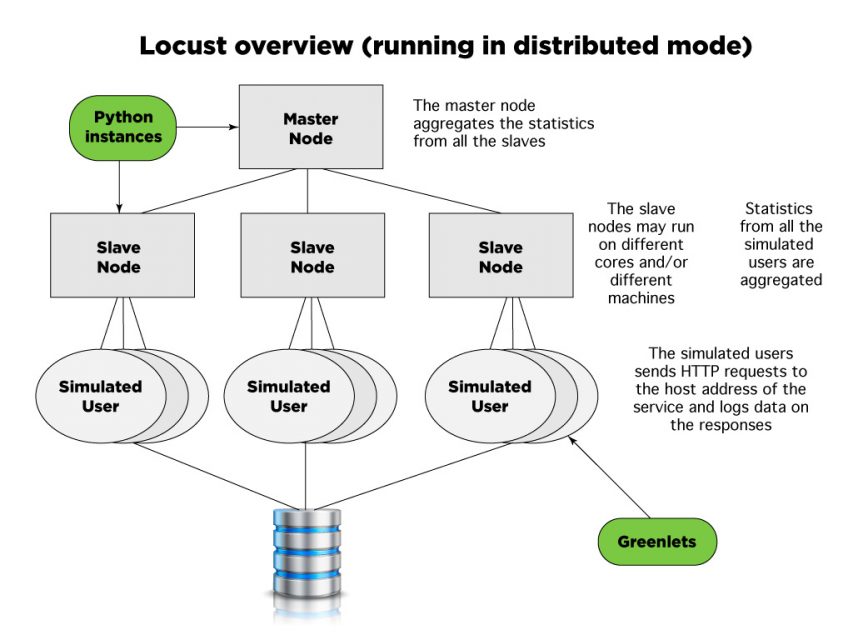
Locust starts a Master Node which starts Slave Nodes and aggregates the statistics from the Slave Nodes. Each Slave Node simulates multiple users via greenlets. Locust supports only HTTP protocol, so unlike other testing tools, Locust can be used to test only web applications.
Setup
Locust is a python package and installation is pretty straightforward. Locust can be used with Python 3.6-3.8. You can simply run
pip install locust
pip install -e git://github.com/locustio/locust.git@master#egg=locustio
It is highly recommended to set up a virtual environment first.
The steps mentioned above work for Linux. Installation on Windows or MacOS will require additional packages installation.
Once the installation is done, you can test it via running following command in terminal:
locust --helpYou will see the following output:

In the following sections we will explore Locust functionality and show basic test setup.
Basic Usage
First, we need a basic web server for performance testing. Here, we will use Flask development server, server.py.
from flask import Flask

server_port = 5000
app = Flask(__name__)

@app.route('/login/<username>/<password>')
def login(username, password):
    return f'Hello, {username}:{password}!'

@app.route('/logout')
def logout():
  return f'Bye {username}:{password}!'

@app.route('/')
def index():
  return 'Index'

@app.route('/test')
def test():
  return 'Test'
if __name__ == "__main__":
    app.run('0.0.0.0',port=server_port)
Run test server via
python server.pyWe can access the server via localhost:5000 and see ‘Index’ output.
Secondly, we need to write a Locust script. Create a new file locust_test.py
from locust import HttpLocust, TaskSet, task

class User(TaskSet):
   def on_start(self):
       self.client.post("/login", {"username":"admin", "password":"password"})

   def on_stop(self):
       self.client.post("/logout", {"username":"admin", "password":"password"})

   @task(2)
   def index(self):
       self.client.get("/")

   @task(1)
   def test(self):
       self.client.get("/test")

class WebsiteUser(HttpLocust):
   task_set = User
   min_wait = 5000
   max_wait = 9000
This is it! This code is enough to start testing. Let’s analyze the example above, before going to testing itself. TaskSet is a base class that provides following methods:
- setup -- is called once, it is not given in the example
- on_start -- is called once by each new loading user at the beginning of work.
- on_stop -- is called once by each user when the test has finished its work.
- tasks -- is the performance of the tasks themselves.
- teardown -- is called once when TaskSet has finished its work — it is also not given in the example.
In this example, we have @task decorators, which adds functions to the user and sets it’s frequency.
Last class in the example is WebsiteUser.
- task_user -- here we set User behaviour model
- min_wait -- minimum time of waiting between calls
- max_wait -- maximum time of waiting between calls
Starting Testing
First, we need to start testing server running:
python server.pyTo launch the testing simply run
locust -f locust_test.py --host=http://localhost:5000Where the host is an address of a tested resource.
If there are no mistakes in the test, the loading server will start and will be accessible at http://localhost:8089/

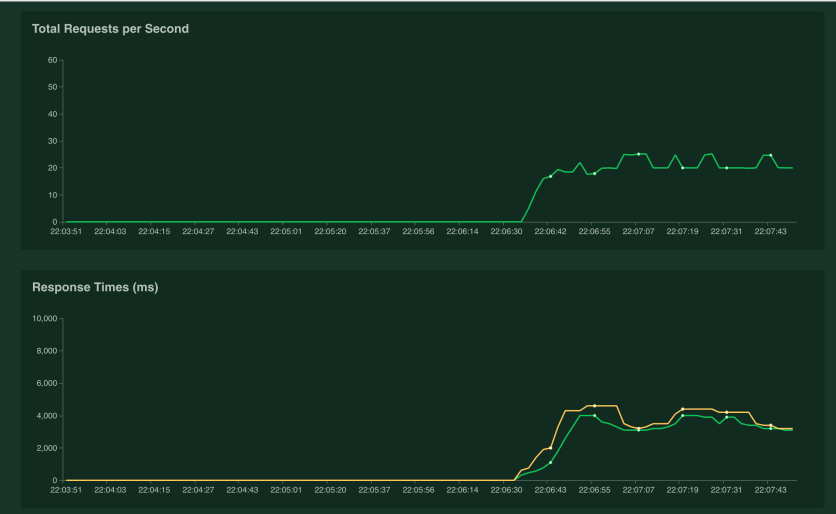
Here we can also set the number of users to create the load, as well as their increment per second. After pressing Start swarming button and waiting a few minutes we can see response statistics:

Conclusion
I found Locust an amazing tool. It is easy to use, supports testing REST API out of the box using HttpClient, extensible, and gives an easy way to specify what you want to do in your test. Give it a shot for load testing your application.
Stay tuned!


